
What protective gear needed for cleaning underground water tanks should you wear? Learn the safety rules, equipment lists, and a step-by-step DIY guide.
Protective Gear Needed for Cleaning Underground Water Tanks: A Homeowner’s Safety Guide
Look, I get it, scrubbing a tank is exhausting but saving a massive chunk of cash by avoiding expensive professional cleaning services makes it worth the effort. There is something deeply satisfying about tackling home maintenance with your own two hands.
But here is the real talk about water safety and DIY projects: cleaning an overhead tank is one thing, but climbing down into an underground reservoir is a completely different ballgame.
Underground water tanks are classified as confined spaces. They are dark, poorly ventilated, damp, and can quickly accumulate dangerous levels of toxic gasses or chemical fumes once you start pouring disinfectants like chlorine bleach inside. If you do not prepare properly, you risk slipping on slick biofilm, suffocating from lack of oxygen, or suffering severe chemical burns to your eyes and lungs. Before you even think about cracking open that access hatch, you need to understand the exact protective gear needed for cleaning underground water tanks to keep yourself entirely out of harm’s way.
At TankClean.site, we love a good DIY victory, but safety always comes first. Let us break down the critical safety equipment you need and how to use it during a deep clean.

The Hidden Dangers of Underground Tanks
Why is special gear so critical for an underground system compared to a regular overhead plastic tank? It boils down to physics and chemistry.
First, toxic gasses like hydrogen sulfide (from decaying organic matter and sludge) are heavier than air. They settle quietly at the bottom of underground concrete or fiberglass tanks. Second, when you use high-strength sanitizers inside a small, enclosed space, the fumes build up rapidly because their is nowhere for the air to escape naturally.
Without the proper protective gear needed for cleaning underground water tanks, a homeowner can quickly experience dizziness, nausea, or even lose consciousness while deep inside the structure.
Essential Safety Gear Checklist
Do not attempt to procced with your cleaning weekend using just an old pair of sneakers and a t-shirt. Treat this like an industrial maintenance task.
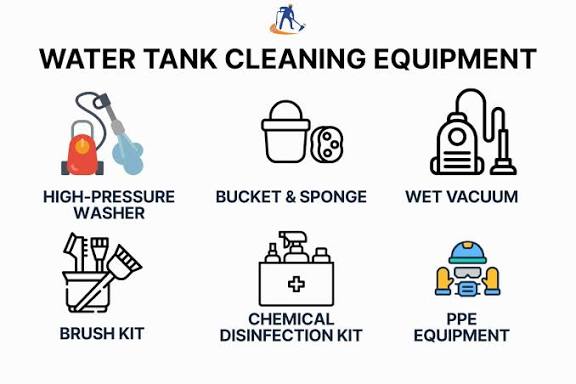
Here is the definitive checklist of safety equipment every homeowner must gather before opening the tank hatch.
| Protective Gear Item | Specific Type Required | Primary Safety Function | Why You Can’t Skip It |
| Respiratory Protection | Half-face respirator with chemicales cartridges (or at minimum an N95 mask for light scrubbing) | Filters out toxic organic fumes, mold spores, and intense chlorine gas | Prevents lung irritation, dizziness, and chemical asphyxiation. |
| Eye Protection | Sealed safety goggles (not basic open glasses) | Blocks splashing muddy sludge, chemical droplets, and high-pressure water back-spray | Prevents chemical blindness or accidental contamination from dangerous waterborne pathogens. |
| Hand Protection | Heavy-duty, elbow-length nitrile or PVC rubber gloves | Protects skin from raw concentrated bleach and rough abrasive concrete surfaces | Standard latex gloves tear instantly on rough walls, exposing your skin to strong chemicals. |
| Footwear | Waterproof rubber boots with non-slip, deep-tread soles | Provides vital grip on slick, algae-covered tank floors while keeping feet dry | Slipping inside a concrete tank can cause fractures or concussion in a confined space. |
| Body Protection | Disposable Tyvek protective suit or old long-sleeve clothing | Acts as a barrier against old contaminated sludge, bird droppings, and bleach splashes | Keeps biological pathogens and harsh cleaning mixtures off your skin. |
Crucial Pre-Cleaning Setup and Venting
Having the equipment is only half the battle; you also have to prepare the space itself.
Never drop directly into an underground water tank the moment you open the lid. Open the access hatch completely and let it vent naturally for at least 2 to 3 hours. For maximum safety, set up a portable electric utility fan at the top of the hatch and run a flexible duct line down into the tank. This forces fresh air into the bottom of the reservoir, continuously displacing stagnant gas and chemical vapor while you work.
Furthermore, always use the buddy system. Never enter an underground tank without a reliable family member or friend standing directly outside the hatch watching you the entire time. They should have a flashlight and be ready to assist or call for help if you show any signs of distress.
Step-by-Step Guide to Safely Cleaning Your Underground Tank
Once you are fully suited up in your personal protective equipment, it is time to tackle the cleaning process systematically.
Step 1: Isolate the Water and Power Systems
Turn off the electrical breakers powering your home’s water pump and the water heater. If a pump turns on automatically while the tank is empty or dry, the motor can burn out in minutes. Close the main inlet valves to prevent incoming water from entering while you are working.
Step 2: Pump Out the Old Water
Use an external or submersible utility pump to empty the reservoir. Lower the pump down through the hatch until it sits flat on the floor. Run the discharge hose far away from your house and garden, ensuring the stagnant water drains into a proper municipal sewage line. Leave about 2 to 3 inches of water at the bottom to help loosen the heavy mud layer.
Step 3: Remove the Heavy Sludge and Sediment
Put on your rubber boots, safety goggles, and respirator before entering. Use a flat-head shovel or a heavy plastic scoop to gather the thick layer of mud and organic silt that has settled on the floor. Collect the sludge into plastic buckets and have your buddy pull them up via a secure rope. Removing this physical debris first is essential because organic mud completely neutralizes the power of disinfecting chemicals.
Step 4: The Mechanical Scrubbing Phase
Mix a cleaning solution consisting of warm water and a small amount of liquid dish soap or white vinegar. Using a stiff-bristled nylon brush attached to an extension pole, vigorously scrub the ceiling, walls, and floors. Work from the top down, scrubbing away the sticky layer of biological film. Avoid wire brushes on concrete or fiberglass linings, as they can cause micro-scratches that provide safe havens for future bacterial growth.
Step 5: High-Pressure Rinsing and Extraction
Use a high-pressure garden hose nozzle or a light pressure washer to spray down the walls, washing all soapy residue and remaining film to the floor. Use your submersible pump or a heavy-duty wet-dry shop vacuum to remove every drop of this dirty rinse water from the bottom of the tank.
Step 6: Shock Chlorination Disinfection
Now that the surfaces are physically spotless, it is time to destroy the invisible bacteria and viral strains hiding in the porous concrete. Fill the tank roughly one-quarter full with fresh, clean water. Add 1 cup of plain, unscented household liquid bleach for every 100 gallons of your tank’s total holding capacity. Finish filling the tank with water so that the incoming pressure mixes the chlorine perfectly throughout the reservoir.
Step 7: Treat the Internal Home Pipes
Go inside your house and turn on every single sink faucet, shower, and outdoor tap. Keep them running until you smell the distinct, sharp scent of chlorine coming from the tap, then shut them off immediately. This draws the sanitizing water through your home’s internal pipe network. Leave the entire system alone to sit undisturbed for 8 to 12 hours. Do not use this water for cooking, drinking, or bathing during this holding window.
Step 8: Final Flush and Residual Testing
After the holding period is over, drain the highly chlorinated water entirely out of the tank using your external drain or pump system. Refill the tank completely with fresh water. Run all your indoor taps for 5 to 10 minutes to flush out any chemical residues from the lines. Use a standard pool chlorine test strip to check the water at your kitchen sink. Once the reading drops below 4.0 ppm, your water supply is perfectly safe, pure, and ready for daily family use.
Protect Yourself Every Single Step of the Way
Cleaning your own residential water storage system is a great way to maintain household efficiency without spending a fortune, but it should never cost you your health. Investing a small amount of money in the proper protective gear needed for cleaning underground water tanks ensures that you finish the job safely and effectively.
Make it a habit to check and deep clean your water storage systems at least once every twelve months to stop dangerous biofilms and sediment layers from taking over.
Don’t leave your safety to guesswork on maintenance day. Download our comprehensive DIY Underground Tank Safety Guide & Gear Checklist today to make sure you have everything you need before you open the hatch. You can also subscribe to our regular maintenance newsletter on TankClean.site to receive timely, seasonal reminders and expert water hygiene tips straight to your inbox!