
Wondering how often should residential water tanks be cleaned? Discover the ideal maintenance schedule, hidden contamination signs, and a DIY guide.
How Often Should Residential Water Tanks Be Cleaned
Out of sight, out of mind. That is exactly how most homeowners treat their primary water storage systems. Whether you have a massive concrete tank buried deep underground or a plastic overhead unit absorbing intense heat on your roof, it is remarkably easy to forget they exist. We turn on our faucets, pour a glass of water, or jump in the shower, assuming that because the water looks relatively clear, everything is perfectly fine underneath the lid.
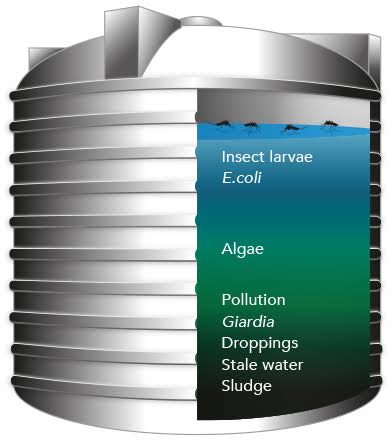
But behind the scenes, a completely different story is unfolding. Over weeks and months, fine silt, heavy minerals, dust, and organic matter settle to the bottom of your reservoir. Look, I get it, scrubbing a tank is exhausting but ignoring this chore turns your clean water supply into an active biological incubator. The big question every responsible homeowner eventually asks is: how often should residential water tanks be cleaned to prevent severe contamination?
Here is the real talk about water safety: waiting until your water smells foul or turns brown means you have waited far too long. At TankClean.site, we want to help you take full control of your domestic water hygiene. You do not need to rely on expensive professional services to maintain a pristine water network. With a clear understanding of your tank’s optimal maintenance schedule, a few standard household tools, and a bit of elbow grease, you can handle your own water care safely and completely on your own terms.
The Definitive Timeline: Determining Your Cleaning Frequency
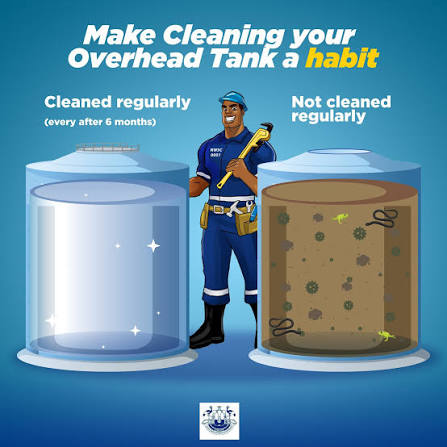
So, let us cut straight to the chase. As a general industry standard, residential water tanks should be thoroughly cleaned and disinfected at least once every six months. Under absolute ideal conditions with highly filtered municipal water, you might stretch this interval to a maximum of twelve months, but doing so increases your vulnerability to hidden bacterial biofilms.
However, a one-size-fits-all timeline doesn’t match every household reality. Several critical environmental factors can accelerate how quickly sludge and bacteria establish their footing inside your storage system, forcing you to adjust your cleaning schedule accordingly.
1. Source Water Quality (Municipal vs. Well Water)
If your home relies on untreated tube well water or groundwater, it carries a substantially higher load of heavy minerals, fine sand, and iron-oxidizing bacteria. Well-fed tanks typically require a thorough scrub down every 4 to 6 months to prevent a thick layer of mud from cementing itself onto the tank floor. Conversely, heavily treated municipal water contains residual chlorine which slows down biological growth, allowing you to stick closer to a biannual or annual schedule.
2. Environmental Heat and Tank Location
Bacteria, viruses, and green algae thrive in warm, stagnant environments. If your overhead plastic tank is exposed to direct, blistering sunlight all day long, the internal water temperature climbs into the ideal incubation zone for pathogens. These high-heat systems demand more frequent inspections and cleanings than insulated underground concrete reservoirs.
3. Structural Integrity and Entry Gaps
Is your inspection lid tight? Are your overflow lines completely exposed to flying insects, lizards, or birds? If your tank has minor structural gaps, organic debris like leaves, bird droppings, and bugs will constantly infiltrate your water supply. An imperfectly sealed system requires quarterly attention to keep dangerous fecal coliforms from multiplying inside your household plumbing.
The Cost of Neglect: Sludge Accumulation vs. Clean Water
To put this timeline into proper perspective, let us analyze what happens inside an unmanaged system versus one that receives regular, structured DIY care.
| Maintenance Factor | Regularly Cleaned Tank (Every 6 Months) | Neglected Storage Tank (12+ Months) |
| Sediment and Mud Build-Up | Minimal; a thin, easily flushable layer of fine dust. | Severe; a thick layer of dark, organic sludge that locks in anaerobic bacteria. |
| Bacterial Biofilm Presence | Virtually non-existent due to routine disinfection cycles. | Heavy, slimy coatings along internal walls that protect pathogens from light chlorination. |
| Water Taste and Aroma | Crisp, neutral, and completely free of offensive odors. | Earthy, metallic, or a distinct “rotten egg” smell caused by dissolved hydrogen sulfide gas. |
| Plumbing and Appliance Impact | Keeps booster pumps, internal pipe networks, and water heaters free of abrasive grit. | Causes internal scaling, blocks faucet aerators, and damages water heater heating elements. |
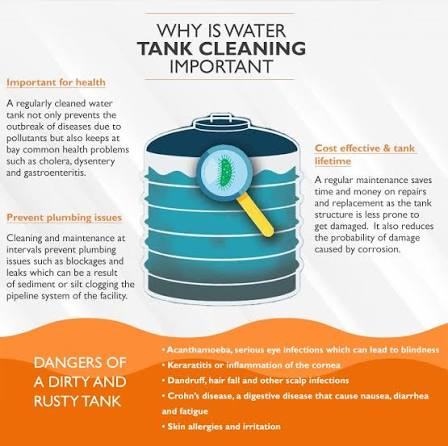
| Health Vulnerability | Total peace of mind for drinking, cooking, and daily bathing. | Increased risk of chronic stomach cramps, skin rashes, and waterborne diarrheal illnesses. |
If your system looks more like the right column of our table, don’t panic. Reclaiming your water purity is completely achievable without calling a commercial crew. Below is our expert-approved, step-by-step blueprint to clean and sanitize your system safely.
Step-by-Step Guide: How to Clean and Sanitize Your Storage Tank Like a Pro
To maximize your efficiency and ensure total decontamination, you must execute the cleaning process in a specific, logical sequence. Before starting, remember to warn everyone in the house that the water network will be completely offline during this procedure.
Step 1: Drain the Reservoir and Isolate Your Pipes
Turn off the electrical breaker to your water pressure pumps to prevent them from running dry. Close the primary distribution outlet valve that connects the storage tank to your indoor home pipes. This step is absolutely critical because you do not want loose mud or raw chemical solutions trickling down into your faucets. Open the bottom drain valve or use a submersible utility pump to empty the water out of the tank completely.
Step 2: Extract the Settled Sludge Layer
Put on high-quality rubber boots, protective eyewear, and a well-fitted mask. If your tank has an access hatch large enough to enter, climb inside with a plastic shovel or a wet-dry vacuum to physically remove the thick layer of accumulated silt and mud sitting on the floor. Collect this debris in clean buckets and discard it far away from your immediate property lines.
Step 3: Vigorously Scrub the Internal Walls
Mix a straightforward cleansing solution using fresh water and standard liquid dish soap in a clean bucket. Using a stiff-bristled nylon scrubbing brush (or an extension pole brush if you are maneuvering from an outside manhole), scrub every square inch of the internal walls, joints, and ceiling corners. You must apply enough pressure to break down the sticky, invisible biofilm layers where bacteria breed. Once complete, rinse the walls thoroughly with a high-pressure garden hose and pump out all the soapy residue until the floor is entirely bare and dry.
Step 4: Run a Shock Chlorination Disinfection Cycle
Ordinary physical scrubbing leaves microscopic pathogens behind; you must chemicaly sanitize the environment to achieve true safety. Fill the tank completely with fresh water. For standard liquid household bleach (5% to 6% sodium hypochlorite strength), use a precise ratio of 1 liter of liquid bleach for every 1,000 liters of water tank capacity.
Mix the solution evenly throughout the tank. Open your main home valve for just 60 seconds and run every indoor tap until you smell a faint trace of chlorine, then shut the taps off. This draws the sanitizing water into your internal plumbing lines so they get disinfected too. Let the system sit completely undisturbed for a contact time of 4 to 6 hours.
Step 5: Final Evacuation and Plumbing Line Flush
After the contact time has procced, use your submersible pump to empty the highly chlorinated water completely out of the tank. Do not discharge this fluid onto your garden beds or grassy lawns, as heavy concentrations of chlorine will immediately destroy sensitive vegetation and soil ecosystems. Refill the tank with fresh water from your primary clean supply line. Go back inside your house and open all faucets, showers, and outdoor taps on full blast for 5 to 10 minutes to completely clear out any leftover bleach or dislodged chemicales from your home pipe lines.
Proactive Habits to Extend the Cleanness of Your Tank
Once your tank is perfectly clean, you can use a few smart preventative strategies to ensure it stays pristine for as long as possible before your next scheduled cleaning.
- Install an Inline Sediment Pre-Filter: Placing a basic cartridge sediment filter on your main water inlet line traps sand, rust, and dirt before it ever enters your storage tank. This dramatically reduces the speed of sludge accumulation, keeping your tank floor cleaner for longer stretches.
- Upgrade to an Airtight Threaded Lid: If your current cover is a loose concrete slab or a cracked plastic cap, swap it out for a heavy-duty threaded lid with a built-in rubber gasket. Keeping out birds, lizards, and blowing dust is half the battle won.
- Secure Vents with Stainless Steel Mesh: Ensure your air vents and overflow lines are tightly covered with marine-grade stainless steel insect mesh (mesh size less than 1mm). This stops disease-carrying mosquitoes from turning your water supply into a personal breeding pool.
Your Ultimate Partner in Home Water Safety
You should never have to cross your fingers and guess whether the water your family uses to wash their faces, brush their teeth, or cook their meals is truly hygienic. Keeping a strict schedule for your water infrastructure does take effort, but protecting your family’s health and preserving your home’s plumbing lines is worth every single drop of sweat.
For more detailed chemical dosage calculators, step-by-step DIY video guides, and expert troubleshooting resources, explore our complete library right here on TankClean.site. We are continuously building straightforward, highly practical content to make home water hygiene accessible and affordable for every household budget.
Ready to confidently map out your home care schedule? Download our free Ultimate Annual Residential Water Tank Maintenance Checklist today to easily track your inspection dates and keep your system running beautifully, or subscribe to our monthly newsletter below to receive automated seasonal reminders right when your underground and overhead reservoirs are due for their next deep clean!