Hiring Professional vs DIY Residential Water Tank Cleaning: Ultimate Guide

Compare hiring professional vs DIY residential water tank cleaning. Discover costs, risks, and a complete step-by-step DIY guide to save money.
Hiring Professional vs DIY Residential Water Tank Cleaning: The Ultimate Choice for Your Home
Let’s be completely honest for a moment. Nobody sits around on a sunny Saturday afternoon wishing they could spend it deep inside an overhead or underground storage container, covered in mud and scrubbing slick walls. It is one of those annoying, out-of-sight home chores that stays completely buried at the bottom of your weekend to-do list until something goes wrong.
But here is the real talk about water safety: that plastic or concrete tank sitting on your roof or under your yard is the single most critical point of your entire domestic plumbing network. Every single drop of water you use to rinse your mouth, wash your fruits, clean your clothes, and bathe your children passes through that chamber. Over time, heavy dust, sand, rust flakes, and organic matter settle at the bottom to form a thick, foul-smelling layer of sludge. Left neglected, it becomes a literal playground for dangerous bacteria, mold, and algae blooms.
Look, I get it, scrubbing a tank is exhausting but you are ultimately left with a serious choice: do you spend your hard-earned money outsourcing the work, or do you take matters into your own hands? Deciding between hiring professional vs DIY residential water tank cleaning can feel like a tricky puzzle. You don’t want to get ripped off by expensive corporate services, but you also don’t want to compromise your household’s health by doing a sloppy job.
Here at TankClean.site, we want to give you the honest, unfiltered breakdown. As the premier online resource for DIY water tank cleaning guides, maintenance tips, and water hygiene, we are here to help you weigh the true financial, practical, and safety differences between going pro and doing it yourself.
The Core Dilemma: Time, Money, and Safety
When you pit professional tank services against a domestic DIY approach, the debate usually boils down to upfront costs versus personal energy. However, there are a few deeper factors that most homeowners completely overlook.
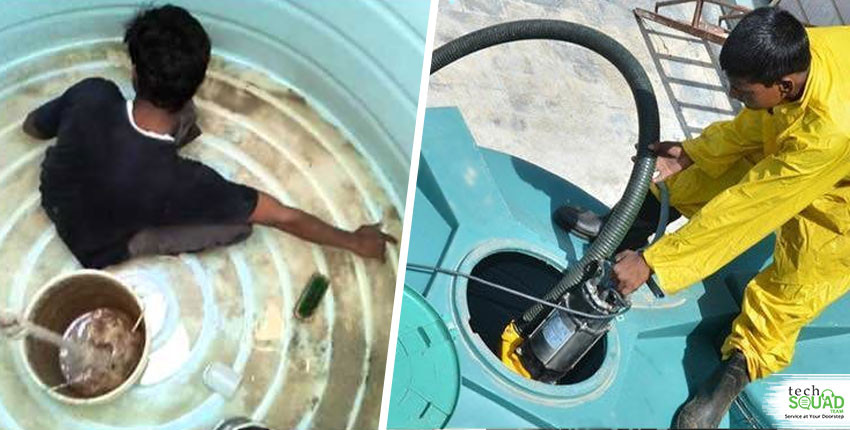
Commercial cleaning crews arrive equipped with high-powered equipment like heavy-duty submersible sludge pumps, high-pressure jet washers, and specialized chemical sprayers. They can knock out a large residential unit in under an hour. But that convenience comes with a premium price tag that repeats every six months.
On the flip side, handling the job yourself costs almost nothing in labor, but it demands an investment of your own physical sweat, a free afternoon, and adherence to specific safety rules. Let’s look at how the two avenues stack up side-by-side.
Detailed Comparison: Pro Service vs. DIY Home Care
To help you visualize where your resources are best spent, review this comprehensive comparison matrix. It measures the practical realities of booking a standard outsourced service against managing a DIY weekend project.
| Evaluation Metric | Hiring a Professional Service Team | Taking the DIY Residential Route |
| Upfront Financial Outlay | High (Recurring costs every single visit) | Very Low (One-time minor tool investment) |
| Time Investment Required | Minimal (1 to 2 hours of external crew labor) | Moderate (3 to 5 hours of your own weekend) |
| Equipment Performance | Industrial-grade pressure washers & mud pumps | Basic household brushes, buckets, or entry pumps |
| Safety Risk Profile | Low for the homeowner (Risks shifted to crew) | Moderate (Requires care around heights/confined spaces) |
| Sanitization Quality | Standardized chemical or UV treatments | Highly thorough manual scrubbing with home bleach |
| Water Waste Control | High (Fast extraction minimizes system downtime) | Variable (Requires careful manual drawdown planning) |
Hidden Dangers of DIY (And How to Avoid Them)
If you lean toward saving money and taking the DIY route, you have to be aware of a couple of common pitfalls that can ruin your plumbing or create health hazards.
Toxic Fume Accumulation
Many homeowners think that pouring gallons of raw, undiluted chemicales into a tank is the best way to kill bacteria. This is a massive mistake. Using concentrated chlorine bleach inside a closed, poorly ventilated plastic tank can fill the space with toxic fumes that cause severe respiratory issues. Always dilute your disinfectants according to professional guidelines.
Physical Structural Damage
If your home relies on a plastic HDPE tank, using sharp metallic scrapers to remove calcified mineral scale can puncture or scratch the plastic interior lining. These tiny scratches create perfect microscopic pockets where bacteria can hide from future washings, permanently ruining your water hygiene. Always use stiff-bristled nylon brushes instead.
The Definitive Step-by-Step DIY Residential Cleaning Guide
If you’ve weighed the options of hiring professional vs DIY residential water tank cleaning and decided that you want to claim the massive financial savings of a DIY job, follow this pro-grade workflow to procced safely and efficiently.
Step 1: Execute a Smart Water Drawdown
Don’t simply open the bottom drain plug and let 500 gallons of pristine water run out into the street. That is literal money fading away down the sewer gutter. Instead, turn off your main booster pump or water inlet valve two days before your project. Let your family naturally use the stored water for everyday laundry, flushing toilets, and running dishes until the tank is mostly empty.
Step 2: Total System Isolation
Before touching a single tool, tightly close the main outlet valve that links the tank to your home’s internal pipe system. This step is absolutely critical. If you leave this open, all the loose mud, sludge, and rust flakes you stir up while scrubbing will rush down into your home plumbing lines, causing massive pipe blocks and contaminating your interior taps.
Step 3: Manual Sludge Extraction
Put on your rubber boots, safety goggles, and heavy gloves. Take a long-handled, stiff-bristled nylon brush and scrub the interior walls from top to bottom to loosen the slick layer of algae biofilm. Use a small plastic scoop or a simple domestic wet-dry vacuum to collect the thick, muddy slurry sitting on the floor and deposit it into a separate bucket. Never flush this gritty slurry down your main drain line, as it will settle in pipe traps and cause severe clogs.
Step 4: Chemical Disinfection Application
Once the walls look visually clean, it’s time to sanitize them on a microscopic level. Create a highly effective, low-cost disinfecting mix by adding 1 cup of unscented household chlorine bleach to 5 gallons of clean water. Using a clean sponge or a basic plastic garden sprayer, apply the mixture evenly across the entire ceiling, walls, and floor of the tank. Let the solution stand for 30 minutes to fully eradicate any lingering bacterial spores.
Step 5: The Final Pure Water Flush
Using a garden hose or a simple high-pressure attachment, wash down the interior surfaces thoroughly. Pump or scoop out this chemical rinse water completely. Keep rinsing until there is absolutely no lingering chemical smell left inside the tank and the water pooling along the bottom is perfectly clear.
Step 6: System Re-Commissioning
Close the tank’s external drain port and open your main inlet valve to fill the unit back up with fresh water. Once the tank is full, open the primary distribution valve leading into your home. Go to the furthest taps in their system and run the water for two minutes to clear out any small air locks and guarantee that any accidental dust residue is entirely flushed from your internal plumbing lines.
Pro-Tips for Extending the Lifespan of Your Clean Tank
To tilt the financial scale heavily in favor of the DIY approach, you want to keep your tank clean for as long as humanly possible so you don’t have to repeat the chore frequently.
The single best upgrade you can make is installing a high-quality sediment pre-filter on your main incoming water supply line. This simple filter catches the sand, clay, rust flakes, and mud before it ever enters your storage tank, keeping the floor pristine and extending your required cleaning intervals from every six months to once every two years.
Additionally, make sure your tank’s access lid is completely airtight. A loose, cracked, or missing lid allows windblown dust, bird droppings, and insects to slip inside, turning your clean water supply back into a hazardous biological soup.
Protect Your Family’s Health and Your Household Budget
At the end of the day, managing your home’s water hygiene shouldn’t feel like an expensive luxury. While hiring commercial teams makes sense for complex industrial properties or individuals with physical limitations, a standard residential plastic or concrete tank can easily be maintained by a motivated homeowner using the proper steps.
Don’t wait until your family gets hit with stomach bugs or your tap water starts running with a cloudy hue. Head directly over to TankClean.site right now to download our free, printable DIY Water Tank Maintenance and Inspection Checklist to keep your next project perfectly organized.
While you are visiting our platform, subscribe to our seasonal maintenance reminder newsletter—we will drop a gentle reminder straight into your inbox every six months so your home’s water infrastructure never falls into neglect again. Explore our complete library of high-authority DIY guides today to keep your home’s water pure, crisp, and incredibly affordable!