
Is your tap water cloudy or foul-smelling? Spot the critical signs your home water tank needs immediate cleaning and learn how to fix it yourself.
Signs Your Home Water Tank Needs Immediate Cleaning
Most of us treat our domestic water supply with a basic sense of trust. We twist open a tap, wash our faces, cook our meals, and pour glasses of water without a single second thought. But if you are storing your household water in an underground concrete reservoir or an overhead plastic unit, that trust needs to be backed up by routine inspections. Look, I get it, scrubbing a tank is exhausting but ignoring what is brewing inside that dark chamber can silently compromise your family’s health. Water storage systems are completely out of sight, which means they are usually out of mind—until the water coming out of your plumbing network starts dropping major red flags.
Waiting around for an annual maintenance date isn’t always safe. Pests can compromise lids, municipal lines can leak mud after heavy rain, and microscopic organisms can form stubborn layers of slime along the walls. Recognizing the urgent signs your home water tank needs immediate cleaning can prevent toxic issues from spreading deep into your indoor pipes.
Here at TankClean.site, we provide the real talk about water safety. You do not need to spend heavy amounts of money hiring expensive professional services just to keep your home’s reservoir pure. With the right guidance, a few standard tools, and a focused afternoon, you can run a professional-grade decontamination project entirely on your own. Let us dive into the warning signs that indicate your system is screaming for a deep clean and look at exactly how to fix it.
The Warning Signs: How Your Water Tells You There is a Problem
When your storage tank is compromised, it leaves distinct clues in the physical properties of the water flowing into your home. If you notice any of these active symptoms, your system requires immediate intervention.
1. A Distinctly Foul or Earthy Aroma
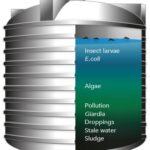
Your water should be entirely odorless. If you turn on your shower or kitchen tap and get hit with a sharp scent of rotten eggs, sewage, or damp mud, you are dealing with a critical biological issue. Anaerobic bacteria (organisms that live without oxygen) thrive beneath the heavy layers of sludge at the bottom of unmanaged tanks. As they feed on organic sediment, they release dissolved hydrogen sulfide gas, creating that highly offensive smell.
2. Visible Silt, Turbidity, or Discoloration
Have you noticed your water looking slightly yellow, brown, or consistently cloudy? This is a classic sign of heavy sediment accumulation. Over time, dust, rust particles from aging city mains, and fine sand settle to the floor of your tank. When new water pumps into the system, it stirs up this mud layer, creating high turbidity (cloudiness) that can ruin your laundry, clog your tap aerators, and wear out your water booster pumps prematurely.
3. Slimy Textures along the Inside Surfaces
If you lift your tank’s inspection lid and run a gloved hand along the inner wall, it should feel clean and smooth. If it feels slick, greasy, or slimy, you are touching a mature bacterial biofilm. Biofilms are complex structures created by colonies of microbes to protect themselves from low chemical levels. This slime layer acts as a constant breeding factory, continuously releasing harmful pathogens into your daily water lines.
4. Flakes of Rust or Black Algae Speckles
For homes using older galvanized iron tanks or concrete tanks with exposed metal reinforcement bars, rust flakes are a severe threat. Additionally, if your overhead plastic lid is cracked, sunlight will enter the tank, triggering rapid photosynthesis. This leads to heavy infestations of dark green or black algae that look like floating specks in your toilet flush tanks and buckets.
Diagnosing Your System: Symptom Risk Assessment
Before pulling out your cleaning tools, it helps to understand what the specific changes in your water actually mean for your household plumbing and health.
| Detected Water Symptom | Immediate Root Cause | Potential Health & Structural Risks | Urgency Level |
| Pungent Rotten Egg Smell | Hydrogen sulfide gas from deep bottom sludge layers. | Chronic headaches, nausea, accelerated pipe corrosion. | Critical — Requires immediate drainage. |
| Cloudy, Muddy, or Tinted Liquid | Heavy accumulation of fine sand, dirt, and external runoff. | Skin irritation, clothing stains, ruined water heater elements. | High — Schedule a DIY clean this weekend. |
| Slimy Wall Coatings or Floating Scum | Advanced biological biofilm and active algae growth. | Severe stomach cramps, waterborne diarrhea, ear infections. | Critical — Shock chlorination mandatory. |
| Gritty Mineral Flakes / Red Tints | Severe tank corrosion or scaling along joints. | Damaged pump seals, metallic water taste, stained porcelain. | Moderate — Flush, scrub, and inspect structure. |
If your domestic water network is displaying any of these indicators, their is no reason to delay. Let us walk through the exact, professional-approved method to safely clean and sterilize your system on your own.
Step-by-Step Guide: How to Safely Clean and Disinfect Your Water Tank
To ensure you fully wipe out the contamination without damaging your plumbing lines, you must follow this logical sequence carefully.
Before you start, make sure you have gathered the proper equipment. Refer to the safety protocols shown in the checklist above, ensuring your work area is properly ventilated before entering any confined spaces.
Step 1: Isolate and Drain the Entire Network
Shut off the main incoming water line that fills your storage unit. Locate the primary distribution valve that sends water out of the tank and down into your household plumbing, and close it tightly. This ensures that no loose mud, bacteria, or concentrated chemicales enter your home’s internal pipes during the deep wash. Hook up a submersible utility pump to a long discharge line and empty the entire volume of dirty water directly into an outside sewage drain.
Step 2: Manually Remove the Sludge Layer
Put on high-quality rubber boots, protective splash goggles, and a well-fitted mask. Once the water level is completely down, use a plastic scoop or a heavy-duty wet-dry vacuum to physically remove the thick layer of mud and silt packed onto the bottom floor. Collect this debris in buckets and dump it away from your immediate property.
Step 3: Vigorously Scrub Away the Biofilm
Mix a basic washing solution of fresh water and regular liquid dish soap in a clean bucket. Using a stiff-bristled nylon scrubbing brush (or an extension pole brush if you are working from the outside hatch), scrub every single square inch of the internal walls, joints, and corners. You must apply enough pressure to completely break down the sticky slime layers where bacteria live. Once finished, rinse the walls thoroughly with a high-pressure garden hose and pump out the soapy residue until the floor is totally bare and dry.
Step 4: Run a High-Strength Shock Chlorination Cycle
Physical scrubbing removes the bulk debris, but you must chemicaly sterilize the environment to achieve true water hygiene. Fill the tank completely with fresh water. For standard liquid household bleach (5% to 6% sodium hypochlorite strength), use a precise ratio of 1 liter of liquid bleach for every 1,000 liters of water tank capacity.
Mix the solution evenly throughout the tank. Open your main home distribution valve for just 60 seconds and run your indoor taps until you smell a faint trace of chlorine, then turn them off. This pulls the sanitizing water into your internal lines so your home pipes get disinfected too. Let the system sit completely undisturbed for a contact time of 4 to 6 hours.
Step 5: Final Empty and Faucet Flushing
After the contact time has procced, use your submersible pump to empty the highly chlorinated water completely out of the tank. Do not discharge this fluid onto your garden beds or grassy lawns, as heavy concentrations of chlorine will immediately destroy sensitive vegetation. Refill the tank with fresh water from your primary clean supply line. Go back inside your house and open all faucets, showers, and outdoor taps on full blast for 5 to 10 minutes to completely clear out any leftover bleach lines.
Critical Mistakes to Avoid in DIY Tank Maintenance
Even the most well-meaning homeowners can make simple errors if they lower their guard. Watch out for these three common blunders during your project:
- Leaving the Entry Hatch Unsealed: You can perform a flawless deep clean, but if your main inspection lid is cracked, loose, or missing its gasket, lizards, birds, and flies will infiltrate the tank within days, restarting the contamination cycle all over again. Ensure your hatch is airtight and securely locked.
- Pouring Bleach into a Muddy Tank: Never pour chlorine directly into a tank that is still full of heavy mud. Chlorine naturally binds to organic soil particles, which completely destroys its sanitizing power before it ever reaches the dangerous bacteria living underneath the sludge layer. Always scrape and rinse the mud away first!
- Forgetting to Flush the Water Heater: High concentrations of bacteria or chlorine can stay trapped inside your home’s water heater tank if you only run your cold water taps during the final flushing stage. Always run your hot water lines until the water smells perfectly fresh and clean.
Your Home Hub for Expert Water Hygiene
You should never have to guess whether the water your family uses to wash their faces, brush their teeth, or cook their meals is truly hygienic. Recognizing the early signs of contamination and acting quickly keeps your home safe and saves you thousands in professional repair bills.
For more actionable checklists, chemical dosage calculators, and expert home care advice, explore our extensive library of free guides right here on TankClean.site. We are committed to making residential water safety straightforward, highly practical, and affordable for every household budget.
Ready to confidently manage your home’s water quality this season? Download our free Ultimate DIY Water Tank Cleaning & Sanitization Guide today to track your maintenance steps effortlessly, or subscribe to our monthly newsletter below to receive automated seasonal reminders right when your reservoirs are due for their next inspection!