How to Clean Large Building Water Storage Tanks Safely: Complete Guide

Master how to clean large building water storage tanks safely. Step-by-step DIY guide for landlords & property managers to save costs and stay compliant.
How to Clean Large Building Water Storage Tanks Safely: The Ultimate Guide
Let’s be completely honest for a moment. If you are managing a large residential property, a multi-story apartment complex, or a sprawling commercial block, you have a million things on your plate. From leaky roofs to broken elevators, your to-do list never ends. But there is one massive asset sitting quietly on your roof or buried beneath your concrete foundation that probably doesn’t get enough attention: your central water storage system.
But here is the real talk about water safety: when you are dealing with large-scale water systems, the stakes are incredibly high. We aren’t just talking about a small residential container where a tiny bit of grime only affects one person. A single neglected large reservoir can compromise the health of hundreds of tenants, families, and workers. Over time, heavy sediment, chemical residues, rust flakes, and deadly biofilms build up in these massive units. If left unmanaged, they turn into a ticking time bomb for waterborne diseases like Legionella.
Look, I get it, scrubbing a tank is exhausting, and figuring out how to handle thousands of gallons of storage capacity safely feels completely overwhelming. It is tempting to immediately throw thousands of dollars at corporate commercial service teams. But if you have a reliable maintenance team or some dedicated hands, learning how to clean large building water storage tanks safely can save your property management budget a fortune.
Here at TankClean.site, we specialize in making large-scale water hygiene accessible and manageable. You don’t need a massive commercial budget to achieve industrial-grade cleanliness; you just need the right safety protocols, the proper tools, and a structured game plan. Let’s walk through how to tackle this massive project without compromising anyone’s safety or breaking the bank.
The Unique Challenges of Large-Scale Water Infrastructure
Before we grab our brushes and jump in, we need to acknowledge that a large building’s water network behaves very differently from a standard single-family home setup.
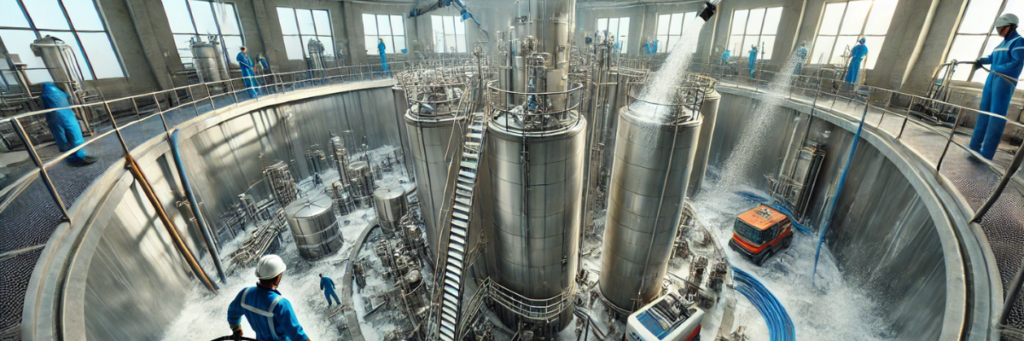
First, there is the sheer volume of liquid. We are dealing with setups that hold anywhere from 5,000 to over 50,000 gallons of water. You cannot simply pull a plug and let that amount of water flood out into the street without causing severe local infrastructure damage or facing massive city fines. Second, these tanks are deep, dark, and often completely enclosed, which introduces major physical hazards for anyone climbing inside.
Regular maintenance—ideally every six to twelve months—is essential to keep the internal water pressure consistent, prevent pipe blockages from loose scale, and keep your property fully compliant with local health codes.
Safety Gear and Tool Checklist for Large Tanks
When tackling a massive tank system, your standard household cleaning kit just won’t cut it. Because these structures are technically classified as confined spaces, having the right specialized safety gear is non-negotiable.
Here is an essential tool checklist your team needs to assemble before attempting to clean large building water storage tanks safely.
| Category | Essential Item | Primary Purpose in Large Tanks |
| Safety Equipment | Gas Detector / Atmospheric Monitor | Tests for toxic gas pockets (like CO or H2S) before entry. |
| Safety Equipment | Full-Body Harness & Retrieval Tripod | Allows external team members to lift a worker out in an emergency. |
| Safety Equipment | Low-Voltage (12V) Waterproof Lighting | Provides bright, shock-proof illumination inside damp concrete/steel. |
| Cleaning Machinery | Heavy-Duty Submersible Sludge Pump | Rapidly evacuates large volumes of thick mud and residual water. |
| Cleaning Machinery | Commercial High-Pressure Washer | Blasts away stubborn calcified scale and slick algae biofilms quickly. |
| Chemical Treatment | Food-Grade Chlorine Bleach or Hydrogen Peroxide | Sanitizes the structural walls at a microscopic level. |
The Step-by-Step Large Tank Cleaning Process
Now that your gear is checked and your safety monitors are calibrated, it is time to procced with the actual cleaning operations. Follow these steps methodically to maintain total control over the environment.
Step 1: Pre-Planning and Building Notification
Never shut down a large building’s water supply on a whim. Give your tenants at least 48 to 72 hours of advanced notice. This allows them to store enough water for their basic needs and prevents frantic phone calls to your management office. Coordinate the shutdown during off-peak hours, such as late at night or early over the weekend, to minimize tenant disruptions.
Step 2: Isolating the Distribution Network
Locate the main supply line feeding into the tank and shut the valve completely. Next, tightly close the main outlet valves that distribute water down into the building’s internal plumbing lines. This isolation step is critical; it ensures that all the dirty, muddy slurry and highly concentrated chemicales you use during the scrub down can never accidentally flow backward into your tenants’ kitchen sinks or bathroom showers.
Step 3: Controlled Drainage of Bulk Water
Using your heavy-duty submersible sludge pump, start routing the clean top-layer water out of the tank. Instead of sending this valuable resource directly down the drain, try to redirect it into secondary holding systems or use it to water the property’s landscaping. Stop pumping once you reach the heavy sediment layer at the bottom, which is usually the last 6 to 10 inches of water.
Step 4: The Critical Atmospheric Test
Before anyone even thinks about stepping through the access hatch, you must lower your atmospheric gas monitor down into the tank. Enclosed water structures can easily trap pockets of deadly carbon monoxide or hydrogen sulfide gas from decaying organic material. Keep your heavy-duty air ventilation blowers running continuously throughout the entire project to ensure a steady supply of fresh oxygen for the internal crew.
Step 5: High-Pressure Blasting and Sludge Extraction
With the safety team monitoring the entry hatch from the outside, the internal cleaners can now begin stripping the walls. Use your commercial high-pressure washer to blast the interior surfaces from top to bottom. The intense pressure will rip away slime layers, calcified deposits, and rust scale without needing abrasive steel tools that could damage the tank’s protective interior liners.
As the dirty water pools on the floor, use your sludge pump to extract it immediately. Do not allow this thick, gritty mud to pass through the building’s drainage pipes, as it can settle in traps and cause massive plumbing failures deep within the building structure.
Step 6: Chemical Sanitization and Disinfection
Once the surfaces are visibly clean, you must disinfect them to kill any microscopic pathogens. Mix a specialized solution of food-grade sodium hypochlorite according to industry standards. Using a chemical spray wand, apply a uniform layer across all the walls, support structural columns, and ceiling panels. Let the disinfectant sit for at least 30 to 45 minutes to completely neutralize any lingering bacteria colonies.
Step 7: Thorough Rinsing and De-chlorination
Rinse the entire interior down completely with clean water until there is absolutely no chemical smell left inside. Pump this rinse water out completely. If your local environmental laws prevent the discharge of highly chlorinated water into public sewage systems, pass the liquid through a neutralizing de-chlorination filter block before releasing it.
Step 8: Refilling and Post-System Flushing
Open your main water mains and let the tank fill back up to its normal operating level. Once full, open the building’s distribution valves. Go to the furthest taps on the property’s upper and lower floors and run them for a few minutes to flush out any trapped air bubbles and ensure that any accidental residual sediment is cleared from their pipe networks.
Managing Your Maintenance and Compliance Records
In large-scale property management, a job that isn’t properly documented is a job that legally never happened. Municipal health inspectors and insurance providers regularly demand to see proof of structural water sanitation.
Always maintain a dedicated building compliance folder. This file should contain signed copies of your worker confined space permits, detailed logs of the exact chemical concentrations used, and certified laboratory water test results showing zero coliform counts after the cleaning.
At TankClean.site, we always stress that keeping an organized compliance log is the single best way to protect your business from liability while maintaining a healthy, happy tenant community.
Keep Your Building’s Water Safe and Compliant
Learning how to clean large building water storage tanks safely is a challenging but incredibly rewarding aspect of proactive facility management. It keeps your infrastructure running efficiently, extends the operational lifespan of your building’s plumbing, and guarantees safe water for everyone relying on your property.
Don’t leave your building’s compliance or your tenants’ health up to chance. Head over to TankClean.site right now to download our comprehensive Commercial Property Water Safety Kit, which includes OSHA-compliant entry logs, chemical calculation worksheets, and printable maintenance tracking sheets.
While you are there, consider subscribing to our corporate asset management newsletter to get timely, seasonal reminders sent directly to your inbox every six months so you never miss a critical cleaning window. Explore our site today for more expert guides on industrial water hygiene and smart property maintenance!