
Discover the absolute best time of year to clean your water tank. Avoid contamination risks with our seasonal maintenance timeline and step-by-step DIY tips.
Best Time of Year to Clean Your Water Tank: A Seasonal Homeowner’s Guide
We track a lot of seasonal chores throughout the year. We clean out our gutters before the autumn leaves fall, we service our air conditioners right before the blistering summer heat waves hit, and we winterize our pipes to prevent freezing disasters. But when it comes to domestic water hygiene, most people simply clean their water storage reservoirs whenever they finally remember to do it.
Is there actually a best time of year to clean your water tank, or does it not matter at all?
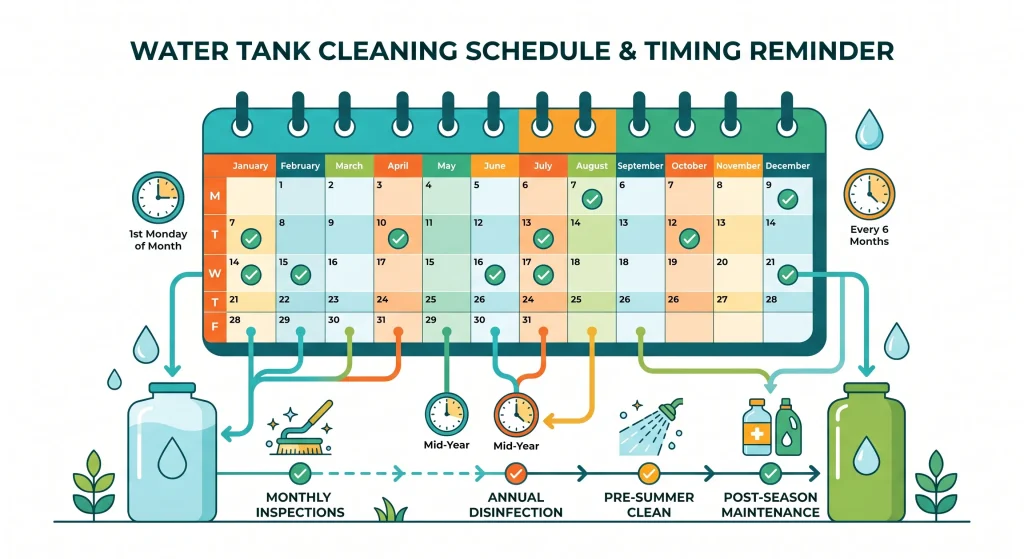
Here is the real talk about water safety and seasonal changes: timing your maintenance correctly makes a massive difference in how easy the job is and how long your tank stays sterile. While you should inspect your system at least twice a year, the absolute ideal periods for a deep, thorough clean are late spring (just before summer starts) and late autumn (right before winter sets in).
Look, I get it, scrubbing a tank is exhausting but doing it during a freezing winter morning or under a scorching mid-summer sun is a total nightmare. Plus, seasonal weather shifts directly accelerate the growth of bacteria and organic contaminants inside your water supply. At TankClean.site, we help homeowners take control of their domestic infrastructure efficiently. Let’s dive deep into why seasonal timing matters and how you can execute a perfect DIY cleaning routine before the next weather shift.
The Seasonal Matrix: Why Spring and Autumn Win
To understand why specific months are perfect for this chore, we have to look at how different seasons affect the environment inside your plastic overhead or concrete underground storage units.
Let’s look at a comprehensive seasonal breakdown to see how they stack up:
| Season | Operational Pros | Major Challenges | Recommended Strategy |
| Late Spring (Apr – May) | Moderate weather; perfect for drying out seals and visual structural checking. | Prepares the system before peak summer bacterial blooms trigger. | Highly Recommended (Best for a deep biological sanitize) |
| Mid-Summer (Jun – Aug) | Water usage is incredibly high; draining a tank feels wasteful if not carefully managed. | Intense heat speeds up algae multiplying exponentially; toxic fumes inside tanks. | Only attempt if you notice sudden odors or severe water discoloration. |
| Late Autumn (Oct – Nov) | Cool, stable outdoor temperatures; water demand is naturally lower across households. | Falling leaves and high winds can drop organic debris inside unsealed lids. | Highly Recommended (Prepares system for clean winter storage) |
| Winter (Dec – Feb) | Very little biological activity or algae growth occurs in low temperatures. | Freezing water makes scrubbing painful; sealants and patches fail to cure properly. | Avoid deep cleanings unless dealing with an unexpected severe leak. |
If you schedule your primary cleaning sessions right before the extreme weather peaks of summer and winter, you essentially protect your home when the water infrastructure is under the highest stress.
Environmental Factors That Alter Your Cleaning Schedule
While spring and autumn are the golden windows, certain localized environmental shifts might force your hand earlier. Keeping an eye out for these seasonal triggers will prevent your tap water from turning toxic.
Post-Monsoon or Heavy Rainfall Silt Accumulation
If you manage an underground concrete water storage tank, heavy rain is your hidden enemy. Torrential downpours often raise the surrounding water table, which forces groundwater mixed with mud and agricultural runoff through tiny structural fissures in your tank walls. Cleaning your system immediately after the heavy rainy season wraps up ensures that you clear out all that hitchhiking silt before it cements itself to the floor.
Summer Heat and the Dreaded Algae Bloom
Algae requires two things to thrive: sunlight and warmth. During hot summer months, rooftop plastic tanks turn into literal incubators. Even a tiny trace of organic material can blow up into a thick, green biofilm within a couple of weeks. If you didn’t procced with a spring clean, you will likely find yourself dealing with water that tastes earthy or smells like a stagnant pond by July.
Essential Tool Checklist for Seasonal DIY Maintenance
Before you head up to the roof or climb down into your storage unit, you need to verify your tool kit is ready for the specific conditions of the season.
Here is a quick checklist of the gear you need to assemble:
| Tool Category | Recommended Item | Seasonal Purpose |
| Safety Attire | Heavy rubber gloves, anti-slip boots, protective goggles | Prevents slipping on wet moss or getting chemical splashes on skin. |
| Mechanical Cleaners | Stiff deck brush, long extension pole, clean cellulose sponges | Allows you to reach deep structural corners without bending down. |
| Chemical Disinfectant | Unscented liquid chlorine bleach (5% to 6% sodium hypochlorite) | Outperforms natural alternatives like vinegar for true medical-grade sterilization. |
| Ventilation & Light | High-lumen waterproof flashlight, portable battery fan | Essential for keeping air moving inside dark underground chambers. |
Step-by-Step Guide to Cleaning Your Water Tank Safely
Now that you know when to do it and what to bring, let’s map out the definitive step-by-step cleaning procedure to help you maximize your time and effort.
Step 1: System Isolation and Safety Prep
Start by closing the main water supply valve that leads into the tank. Shut down the electrical supply to all booster pumps and household water heaters. If your home heating unit runs dry because there water lines are empty, you risk destroying the internal heating elements completely. Put on your safety goggles and face mask to protect yourself against airborne mold spores or stagnant water bacteria.
Step 2: Strategic Draining
Open your drainage or scour valve to evacuate the bulk of the stored water. Try to plan this chore for a day when your family has naturally depleted the water levels through morning laundry or showers so you don’t waste hundreds of gallons. Leave roughly 4 to 6 inches of water at the very bottom. You will need this shallow pool to mix up the thick floor silt into a movable liquid slush.
Step 3: Deep Wall Scrubbing
Grab your stiff-bristled brush and work your way down the walls systematically. Scrub hard along the water-line mark, structural joints, and pipe inlets where black slime and mineral scaling build up heavily. If you are cleaning during a warmer spring day, work quickly so the wet scum doesn’t dry and bake onto the plastic or concrete surfaces while you are working.
Step 4: Sludge and Mud Evacuation
Once all the algae is detached from the walls, your remaining water pool will look like a thick brown soup. Use a small submersible utility pump or a standard bucket and plastic mug to scoop this sludge out completely. The dryer and cleaner you get the floor now, the faster your final flushing steps will be later.
Step 5: Disinfection Coating
Mix a powerful sanitizing solution using fresh water and unscented liquid bleach. A standard safe baseline for residential disinfection is roughly 150 to 200 ml of standard household bleach for every 1,000 liters of tank capacity. Spray or wipe this solution across all internal surfaces. Let it sit untouched for exactly 30 minutes; this contact time is crucial for the chlorine to dissolve microscopic viral pathogens and deep-seated fungal spores.
Step 6: Final Rinsing and Re-commissioning
Wash down the walls completely with clean water to remove any residual chemicales. Ensure this contaminated flush water exits entirely through your waste or drainage lines—never let it run into your standard household drinking taps. Once the drain runs perfectly transparent, shut the waste valve, reopen the main water intake, and fill your tank with pure, fresh water. Turn your electrical pumps and heaters back on.
Crucial Maintenance Mistakes to Sidestep
Even when working during the perfect season, avoiding common operational traps will protect your hard work. First, never use heavily scented laundry detergents or floral soaps inside your tank. These soaps leave behind chemical residues that bond tightly to plastic and concrete, giving your drinking water a horrible soapy taste that takes weeks of flushing to clear out.
Second, do not forget to inspect your tank lid seal. Many homeowners complete a flawless cleaning job but leave a cracked, brittle rubber seal on their manhole cover. Within days, dust, wind-blown leaves, and insects will find their way back inside, completely ruining your hard work.
Take Control of Your Family’s Water Health
You don’t need to spend massive amounts of money on commercial cleaning crews when you have the right structural blueprint. By aligning your maintenance with the best time of year to clean your water tank, you save physical energy, use less chemical disinfectants, and keep your plumbing infrastructure running perfectly.
Ready to make your home maintenance effortless? Download our easy-to-follow, printable seasonal inspection sheet from TankClean.site. You can also sign up for our automated seasonal reminders so you never have to guess when it’s time to check your system again. Explore our vast online guide library today to master your home hygiene like a pro!