
Learn the exact safe levels of chlorine for water tank disinfection. Master the math, avoid toxic mistakes, and sanitize your water tank safely.
Safe Levels of Chlorine for Water Tank Disinfection
When it comes to home maintenance, very few things are as vital—yet as deeply misunderstood—as chemical sanitization. Look, I get it, scrubbing a tank is exhausting but pouring a jug of bleach into your home water storage system and calling it a day feels incredibly tempting. But here is the real talk about water safety: chlorine is a double-edged sword. Use too little, and harmful bacteria like E. coli or Legionella will continue to thrive in your water. Use too much, and you risk chemical burns, corroded pipes, and toxic drinking water.
To sanitize your home’s water supply like a true professional, you need to understand the exact safe levels of chlorine for water tank disinfection. It is not about guessing; it is about basic math, precise contact times, and proper flushing techniques.
At TankClean.site, we are on a mission to make expert-level water hygiene accessible to every single homeowner. You do not need to hire expensive professional services or buy industrial gear to achieve pristine, safe household water. With a simple bottle of unscented household bleach and this practical guide, you can confidently disinfect your overhead or underground water tank safely all by yourself.
Understanding the Magic Numbers: PPM and Chlorine Strength
Before we look at the actual step-by-step process, let us break down how chlorine is measured. In the water treatment industry, we measure chemical concentrations in parts per million (PPM) or milligrams per liter (mg/L). These two units mean the exact same thing.
When discussing safe levels of chlorine for water tank disinfection, we have to look at two completely different phases of the project:
1. The Disinfection Phase (The “Shock” Level)
This is the temporary, highly concentrated chemical environment required to kill stubborn viruses, algae, and bacterial biofilms clinging to your tank walls. During this phase, water is completely unsafe to drink or bathe in. The standard target concentration for domestic shock chlorination ranges from 20 to 50 PPM, depending on how long you let the mixture sit.
2. The Consumable Phase (The “Safe Drinking” Level)
This is the residual chlorine level that remains in your water after the tank has been cleaned, emptied, refilled, and put back into daily service. According to international health guidelines, the safe level of chlorine for daily consumption and household use is between 0.2 and 2.0 PPM. Anything higher than 4.0 PPM can cause skin irritation, stomach distress, and a heavy chemical stench.
Choosing the Right Product: Bleach vs. High-Strength Powder
Not all chlorine is created equal. Most homeowners use regular liquid bleach because it is cheap and readily available. However, depending on the severity of your tank’s contamination, you might encounter different types of chemicales at the store.
| Chlorine Type | Typical Strength (%) | Ideal Target Use Case | Handling Difficulty |
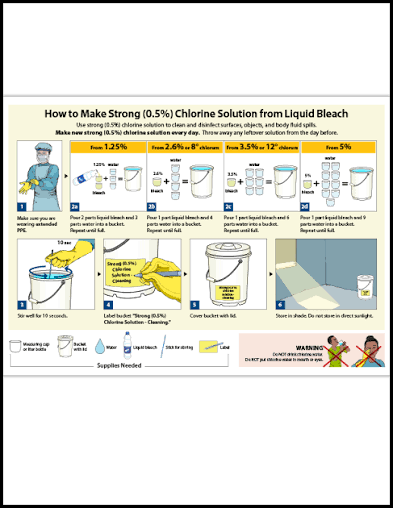
| Liquid Household Bleach (Sodium Hypochlorite) | 5% – 6% | Regular annual maintenance, light sanitizing. | Easy; simply pour directly after measuring. |
| Concentrated Liquid Bleach | 10% – 12.5% | Heavily fouled tanks, large underground reservoirs. | Moderate; requires precise measuring to avoid toxic fumes. |
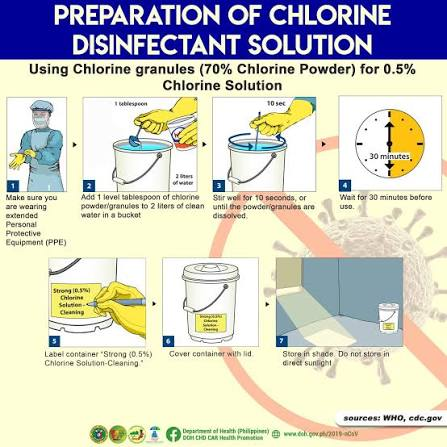
| High-Test Hypochlorite (HTH) (Calcium Powder) | 65% – 70% | Emergency contamination fixes, well water treatment. | Hard; must be dissolved in a bucket before adding to the tank. |
Critical Safety Note: Never use scented bleaches, color-safe varieties, or splash-less formulations for your drinking water tank. These contain chemical fragrances and thickeners that are highly toxic if ingested and are nearly impossible to completely rinse out of your plumbing system.
Now that you know the tools of the trade, let us walk through the exact process to achieve perfect disinfection without putting your family’s health at risk.
Step-by-Step Guide: How to Disinfect and Flush Your Tank
To ensure the chlorine does its job effectively without leaving dangerous chemical residues behind, you must execute the process in a specific chronological sequence.
Step 1: Drain and Physically Clean the Interior
You cannot disinfect mud or thick layers of silt. Shut off your main water supply inlet line and use a submersible utility pump to empty out the remaining water. Put on rubber boots, safety goggles, and a face mask. Grab a stiff-bristled brush and scrub the internal walls, floor, and joints with fresh water to dislodge slimy biofilm. Once everything is clean, pump out all the dirty sludge until the floor of the tank is dry.
Step 2: Calculate Your Chlorine Dosage
To hit the required shock level of 50 PPM, you need to calculate your dosage based on your tank’s total holding capacity.
For standard 5% household liquid bleach, use the following formula:
- Add 1 liter of bleach for every 1,000 liters of water capacity.
- If your tank holds 2,000 liters, you will need exactly 2 liters of bleach.
- If your tank holds 5,000 liters, you will need 5 liters of bleach.
Step 3: Mix and Apply the Solution
Fill your tank about one-third of the way with clean water, then add your measured liquid bleach. Filling the tank the rest of the way will naturally mix the chlorine evenly throughout the water body. Once the tank is completely full, open your main distribution valve into the house for just a brief minute. Go to every faucet and turn them on until you smell a faint scent of chlorine, then turn them off. This ensures the highly chlorinated water fills your home pipes, sanitizing your entire plumbing infrastructure along the way.
Step 4: Let the Contact Time Run
Chlorine needs time to destroy pathogens at a cellular level. Let the solution sit completely undisturbed. If you hit a 50 PPM concentration, the ideal contact time is 4 to 6 hours. If you used a lower concentration of 20 PPM, you should let the system sit for a minimum of 24 hours to ensure complete sterilization.
Step 5: Empty the Highly Chlorinated Water
After the contact time has procced, do not drink this water! Use your submersible pump or your main drainage valve to empty the entire chlorinated mixture directly into an external sewage drain. Keep this water away from garden plants and lawns, as a 50 PPM chlorine mixture will immediately kill sensitive vegetation and damage soil health.
Step 6: Final Refill and Testing for Consumable Levels
Refill your water tank with fresh, clean water from your primary municipal supply or well source. Open all household faucets on full blast for 5 to 10 minutes to clear out any high-strength chemical water that was sitting inside the interior pipes.
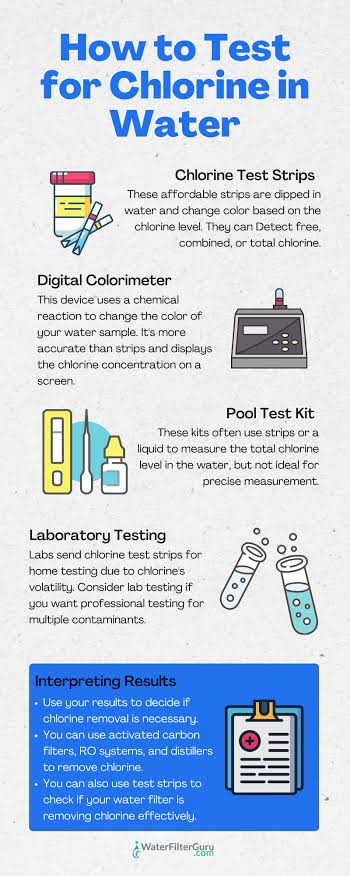
To verify you have reached the proper safe levels of chlorine for water tank disinfection, use a basic pool testing kit or a digital chlorine test strip. Dip the strip into a bucket of water pulled directly from the tap.
- If the reading is under 2.0 PPM, your water is completely safe for drinking, cooking, and bathing.
- If the reading is above 4.0 PPM, run your household taps for another few minutes to dilute the system further with fresh incoming water.
Common Blunders to Avoid During Tank Chlorination
Even with the best intentions, DIYers frequently stumble on a few basic details. Keep these points in mind so you don’t ruin your hard work:
- Forgetting the Water Heater: High chlorine levels can sit inside your home’s water heater tank if you don’t flush the hot water taps during the final step. This can cause long-term corrosion to the internal heating elements.
- Mixing Chemicales: Never mix chlorine bleach with ammonia or acid-based cleaners. Doing so creates chloramine gas, which is highly toxic and can cause severe respiratory distress instantly.
- Assuming Their Water is Clean: Just because the water looks clear doesn’t mean it is safe. Always test the residual chlorine levels before allowing kids or pets to drink from the newly cleaned system.
Your Ultimate Hub for Safe Home Water Care
Taking care of your family’s water quality does not have to be an overwhelming mathematical equation. By keeping your calculations precise and honoring the necessary flush periods, you can enjoy crisp, odor-free, and perfectly sanitized water throughout your household without burning a hole in your pocket.
For more detailed chemical dosage charts, step-by-step DIY cleaning blueprints, and troubleshooting tips, explore our complete library right here on TankClean.site. We are committed to making home water hygiene straightforward, practical, and incredibly affordable.
Ready to confidently manage your next disinfection day? Download our free, easy-to-use DIY Water Tank Chlorine Dosage Calculator & Checklist to get the exact measurements for your specific tank size, or subscribe to our newsletter below for seasonal maintenance reminders and expert home care advice delivered straight to your inbox!