Best Tools Needed for DIY Water Tank Cleaning Project (Top Picks)

Equip yourself like a pro! Discover the best tools needed for DIY water tank cleaning project to sanitize your home’s water tank safely.
Best Tools Needed for DIY Water Tank Cleaning Project: The Ultimate Homeowner Gear Guide
Let’s face it, looking inside your home’s main water storage unit can be a humbling experience. Over time, mud, sediment, and microscopic organisms settle at the bottom, creating a murky layer that compromises your household health. But when you look up the price of professional tank scrubbing services, your jaw drops. You instantly think, “Can I just do this myself?”
Look, I get it, scrubbing a tank is exhausting but waiting for a costly technician while your family drinks sketchy water is even worse. Here is the real talk about water safety: you absolutely can achieve professional-grade results on your own, provided you are armed with the right equipment. Skipping out on the correct gear or using standard kitchen sponges just won’t cut it. To help you succeed, we have compiled the definitive breakdown of the best tools needed for a DIY water tank cleaning project, ensuring your household water supply stays crystal clear.
At TankClean.site, we believe that home maintenance shouldn’t break the bank. With the proper layout of gear, you can transform this intimidating chore into a straightforward, bi-annual routine.
Why Having the Right Tools Matters for Water Hygiene
Attempting to clean an overhead or underground water storage tank with a basic bucket and a cheap broom is a recipe for a bad back and an incomplete job. Without high-efficiency sediment removal tools, you end up just stirring the mud around, clouding the water, and leaving hidden pockets of bacteria intact.
Preventing Cross-Contamination
When selecting tools for a water hygiene project, they must be dedicated solely to this task. Using the same scrubbing brush you use to clean your garage floor introduces dangerous oils, chemicales, and external contaminants directly into your drinking water system.
Safety and Accessibility
Water tanks are deep, dark, and often require working on high ladders. Using tools with adjustable handles, telescopic extensions, and proper safety mechanisms isn’t just about efficiency—it is about keeping you out of the emergency room.
Essential Tool Checklist for Your DIY Project
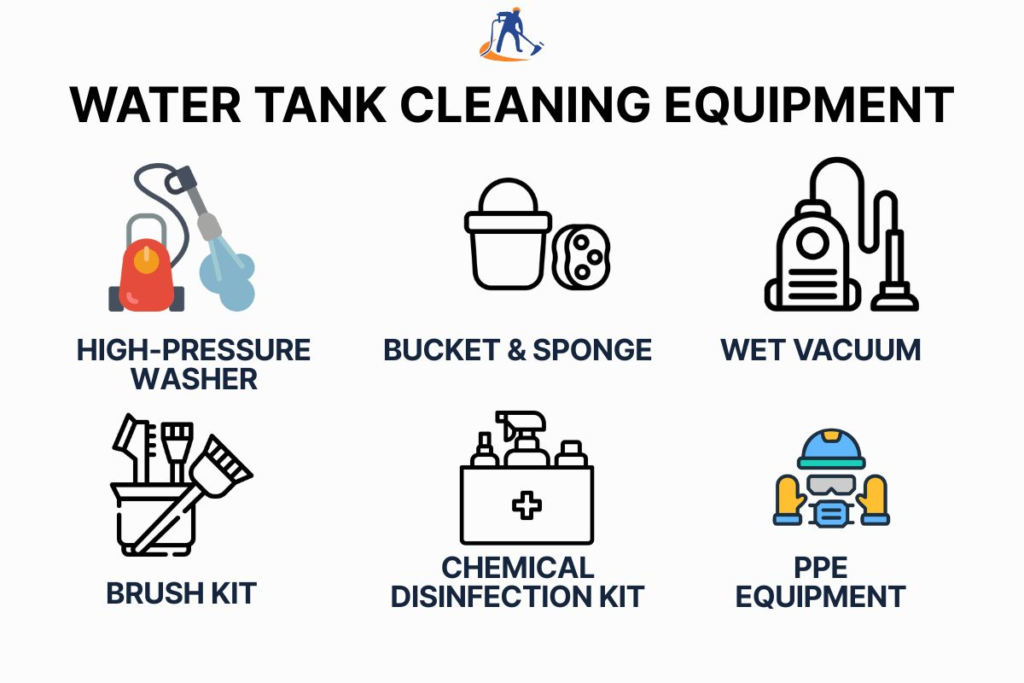
To make your shopping or garage-hunting trip easier, let’s categorize the gear into physical cleaning equipment, water extraction tools, and personal protective wear. The right balance makes all the difference.
Core Cleaning Equipment Comparison
| Tool Category | Standard Household Alternative | Professional DIY Pick | Why It Matters |
| Scrubbing Brush | Basic hand brush | Telescopic hard-bristle brush | Saves your back; reaches 10-foot walls without climbing inside. |
| Water Removal | Small hand plastic mug | Submersible utility pump | Drains 500 gallons in minutes rather than hours of heavy lifting. |
| Lighting | Smartphone flashlight | Waterproof LED headlamp | Keeps both hands free for scrubbing and eliminates electrical shocks. |
| Disinfection | Scented laundry bleach | Pure calcium hypochlorite / food-grade hydrogen peroxide | Sanitizes without leaving toxic perfume residues in the water. |
The Detailed Breakdown of Best Tools Needed for DIY Water Tank Cleaning Project
Let’s dive deep into the specific items that deserve a spot in your maintenance kit. Investing in these items once will save you thousands of dollars in service fees over the lifetime of your home.
1. High-Volume Submersible Sludge Pump
If you are planning to drain your tank completely to tackle deep-seated sludge, a manual bucket routine will take all day. A small 1/4 to 1/2 horsepower submersible utility pump can empty an entire overhead tank in less than twenty minutes. Look for models capable of handling “dirty water” or small solid particles so the pump won’t clog when it hits the thick layer of mud at the base.
2. Telescopic Extension Poles and Heavy-Duty Brushes
You do not want to climb inside a cramped, suffocating plastic or concrete tank if you don’t have to. A high-quality fiberglass telescopic pole that expands up to 12 feet allows you to scrub every single square inch of the tank walls right from the safety of the access hatch. Pair this with a stiff nylon-bristle brush head that cuts through slick bio-films without scratching the plastic lining of the tank.
3. Wet/Dry Shop Vacuum
Once the majority of the water is pumped out, there will always be a stubborn puddle of muddy water mixed with pebbles and loose rust at the very bottom. A standard pump can’t prime itself in half an inch of water. This is where a high-capacity wet/dry shop vacuum shines. It sucks up the remaining sludge effortlessly, leaving the floor bone dry and ready for disinfection.
4. Safety First: Personal Protective Equipment (PPE)
Never overlook your personal well-being when handling sanitation chemicals. You need to protect your lungs, skin, and eyes from strong chemical concentrations and airborne mold spores.
- Chemical-Resistant Nitrile Gloves: Protects hands from concentrated chlorine skin burns.
- Anti-Fog Safety Goggles: Keeps splashback out of your eyes while scrubbing ceilings.
- N95 Dust Mask: Essential if you must climb inside a dry tank where powdered sediment particles can be inhaled.
Step-by-Step Guide: Putting Your Tools to Work
Once you have gathered your gear from our checklist, it is time to execute the project. Follow this structural process to maximize the efficiency of your tools.
Step 1: Pre-Cleaning Isolation
Before turning on any machine, close the main outlet valve leading from the water tank into your home’s plumbing framework. This prevents dirty residue from traveling down into your bathroom taps, kitchen faucets, and water filtration units. Keep the inlet open just long enough to drop the water level to a manageable working height if you plan to do a wet vacuum clean, or shut it off completely if performing a total drain.
Step 2: The First Stage Debris Removal
Drop your submersible pump down to the lowest flat surface of the tank floor. Run the discharge hose out toward an external storm drain or a patch of lawn that can handle the volume. Turn on the pump and let it evacuate the bulk volume of water. Monitor it closely as it nears the bottom so it doesn’t run completely dry and burn out the motor.
Step 3: Wall Scrubbing and Agitation
With the water level sitting low, dip your telescopic brush into a mixture of your chosen sanitizing solution and clean water. Work from the top of the tank downwards using circular motions. The rough bristles will detach algae sheets and hard mineral scaling. Let the loose grime cascade down to the floor.
Step 4: Vacuuming the Concentrated Sludge
Switch on your wet/dry shop vacuum. Using the wide utility nozzle attachment, systematically vacuum the floor of the tank. Move methodically from the furthest corners back toward the main hatch. If the sludge has dried out while you worked, add a small splash of fresh water to loosen it up so the vacuum can pull it up easily.
Step 5: Sanitizing and Rinsing
Mix your food-grade disinfecting agent according to the manufacturer guidelines. Spray or wipe the mixture across all internal surfaces. Let it rest for roughly 30 minutes to eliminate any remaining microscopic spores. After the contact time has elapsed, use a clean hose to wash down the walls one final time, vacuuming out the rinse water so no concentrated chemicals remain behind.
Step 6: System Re-Commissioning
Now you can safely procced to close the main hatch cover tightly to ensure dust and insects can’t find their way back inside. Open the main inlet valve to let fresh supply fill the unit up completely. Open your house outlet valves, and run your indoor taps for two minutes to flush any tiny air pockets out of the plumbing lines. Your system is now pristine!
Common Gear Mistakes to Watch Out For
Even with the perfect tool list, minor execution errors can slow down your progress. Avoid these common DIY pitfalls:
- Using Metal Wire Brushes: Rough iron or steel wire brushes will score and gouge plastic polyethylene tanks. These micro-scratches create the perfect tiny hiding spots where bacteria can multiply rapidly out of reach of your cleaning solutions. Stick strictly to nylon or polymer bristles.
- Ignoring Cord Safety: Since you are working around hundreds of gallons of water with electric shop vacuums and pumps, always ensure your extension cords are plugged directly into a GFCI (Ground Fault Circuit Interrupter) outlet to prevent electrical hazards.
- Using Scented Household Chemicals: Laundry detergents or fragranced bathroom bleaches leave behind chemical residues that taint the taste and smell of your drinking supply for weeks.
Keep Your Home Up to Professional Hygiene Standards
Securing the best tools needed for DIY water tank cleaning project is a smart financial move that keeps your household safe, self-reliant, and healthy. By bypassing expensive professional crews, you gain complete control over the chemical compositions used inside your home’s ecosystem.
For more actionable home water hygiene blueprints, comprehensive equipment reviews, and underground storage guides, rely on TankClean.site as your primary reference hub. We make complex domestic maintenance clear, logical, and fully manageable for everyday homeowners.
Ready to tackle your home water system? Click the button below to join our community newsletter! You will receive a fully downloadable, printable Water Tank Cleaning Tool Checklist & Step-by-Step Blueprint to take straight to the hardware store, plus seasonal email notifications reminding you exactly when it’s time to inspect your system before peak summer heat hits.