The Ultimate Homemade Solution for Water Tank Cleaning and Disinfection Guide

Need a safe homemade solution for water tank cleaning and disinfection? Learn the best DIY methods to keep your water supply pure and germ-free.
The Best Homemade Solution for Water Tank Cleaning and Disinfection: A DIY Expert Guide
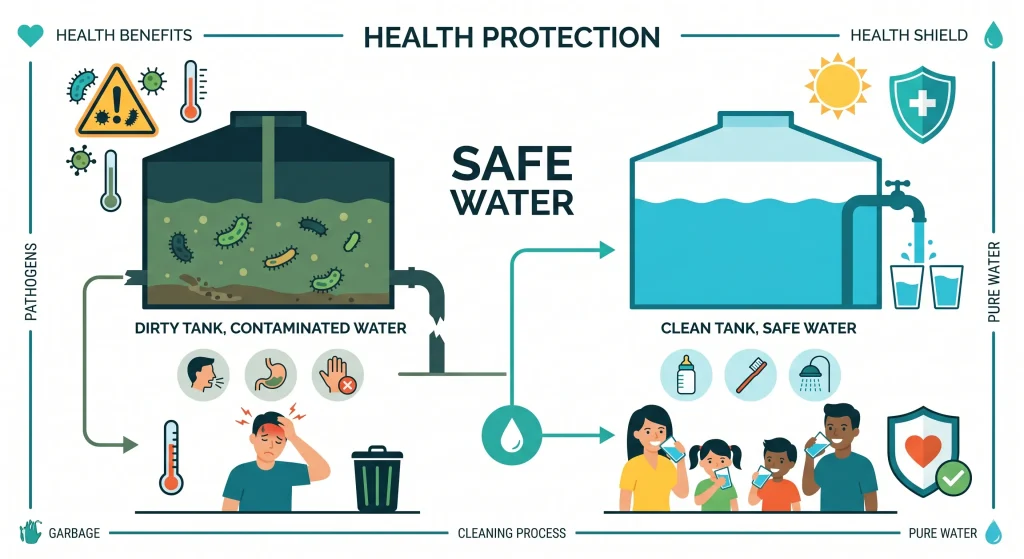
Look, I get it, scrubbing a tank is exhausting but putting off this chore is a massive risk to your family’s health. We often forget about the water storage tanks sitting on our rooftops or tucked away in our basements until something goes wrong. Maybe the water starts smelling a bit off, or you notice a drop in pressure. By the time you spot these issues, the interior of your tank is likely already home to a layer of sludge, algae, and potentially harmful bacteria like E. coli or Legionella.
Here is the real talk about water safety: hiring a professional cleaning service every few months can get expensive fast. Most of the heavy lifting can be done easily by you, the homeowner, using simple ingredients you likely already have under your kitchen sink. Finding the right homemade solution for water tank cleaning and disinfection is not just about saving money; it is about taking full control over the hygiene of the water you use to bathe, brush your teeth, and cook.
At TankClean.site, we advocate for proactive maintenance. A clean tank is the first line of defense against waterborne illnesses. In this guide, we will walk you through the most effective DIY mixtures and the exact step-by-step process to get your tank sparkling clean, safely and efficiently.
Why Rely on Homemade Solutions for Water Hygiene?
You might be wondering why you would mix your own cleaning agents instead of buying expensive, branded “tank cleaners” from the hardware store. The truth is, many of those commercial products are just rebranded versions of simple household ingredients, sold at a massive markup.
When you prepare a homemade solution for water tank cleaning and disinfection, you know exactly what is going into your water supply. You aren’t dealing with mysterious proprietary additives that might leave residues. Plus, household staples like vinegar, baking soda, and chlorine bleach—when used in the correct ratios—are incredibly effective at breaking down mineral deposits and obliterating biological contaminants.
However, a word of caution before we start: these are potent materials. Look, if you think their is a magic shortcut that requires zero effort, you might be tempted to skip safety steps, but please do not. Water safety is serious business, and we are dealing with chemicales that require respect and proper handling.
The Cleaning Agent Comparison
Choosing the right mixture depends on the level of contamination and the material of your tank. Use this table to decide which approach fits your needs.
| Agent | Best For | Pros | Cons |
| Household Chlorine Bleach | Deep sanitization, heavy algae, annual cleaning | Highly effective; kills 99.9% of bacteria and viruses. | Strong odor; requires thorough flushing; can damage sensitive skin. |
| White Vinegar | Mineral scaling, light grime, calcium deposits | Eco-friendly; food-safe; great for breaking down hard water crusts. | Weak against stubborn biological colonies; smells strong initially. |
| Baking Soda Paste | Scrubbing stains, deodorizing, gentle abrasion | Non-toxic; excellent for scrubbing without scratching plastic/concrete. | Not a disinfectant on its own; requires rinsing. |
Essential Pre-Cleaning Safety Protocols
Before you start messing around with mixtures, you need to prioritize your personal safety. Tank cleaning is not just about the water; it is about the environment you are working in.
First, always wear protective gear. This includes rubber gloves, non-slip boots, and safety goggles. If you are cleaning an underground concrete tank, ensure you have a “buddy” outside the tank who can pull you out if you feel lightheaded. These spaces can sometimes accumulate dangerous gases or suffer from low oxygen levels.
Ensure that you have disconnected all electrical power sources connected to the tank, such as automated pumps or heating elements. You want to make sure the system does not kick on while you are inside or while you are actively draining the water.
Step-by-Step Guide: How to Clean Your Tank DIY
Now, we will procced to the scrubbing phase. This process applies whether you are using a bleach-based disinfection method or a more natural vinegar-based deep clean.
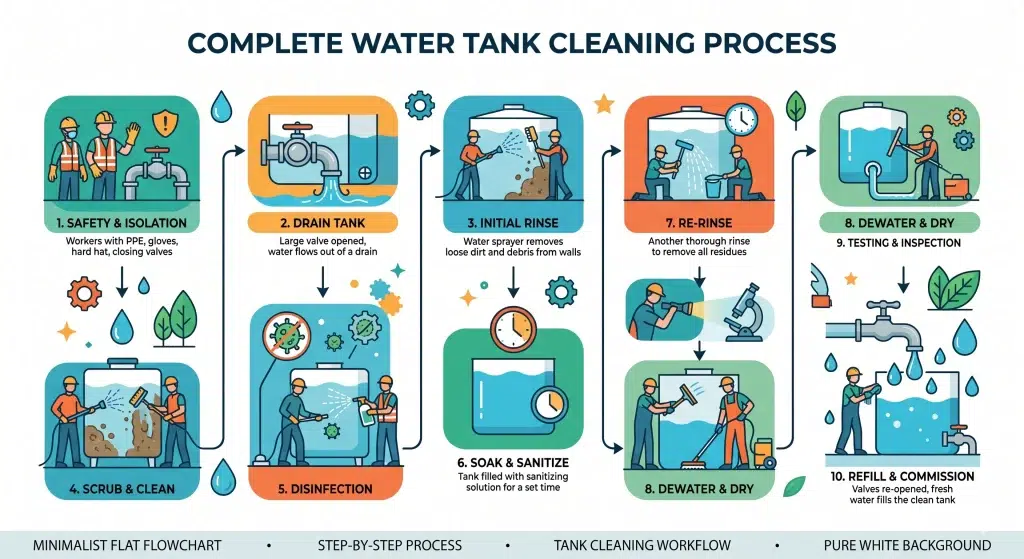
Step 1: Isolation and Initial Draining
Shut off the main inlet valve that feeds fresh water into the tank. Close the outlet valve that feeds water into your home’s plumbing. This is crucial—you do not want the dirty, sediment-heavy water you are about to scrub off the walls to end up in your kitchen taps or showerheads. Open the drain or scour valve and let the water flow out. Use a submersible pump if you have one to drain the tank faster, leaving only a few inches at the bottom.
Step 2: The Manual Scrub
Once the water level is low, get inside the tank with your chosen brushes. If you are using a bleach solution, apply a dilute mix to the walls using a long-handled brush. If you prefer a more natural approach, make a thick paste of baking soda and a little water to scrub away stubborn rings of algae or mineral scale. Scrub from the top down. Work systematically around the interior circumference. Do not forget the lid or the inlet pipe, as these are common spots for mold buildup.
Step 3: Sludge Removal
After scrubbing, you will see a dirty, muddy pool at the bottom. This is where the sediment has settled. Use a heavy-duty bucket or a shop vac to remove this sludge completely. If you are cleaning a large tank, a submersible mud pump is your best friend here. Get the floor as dry as possible.
Step 4: Disinfection
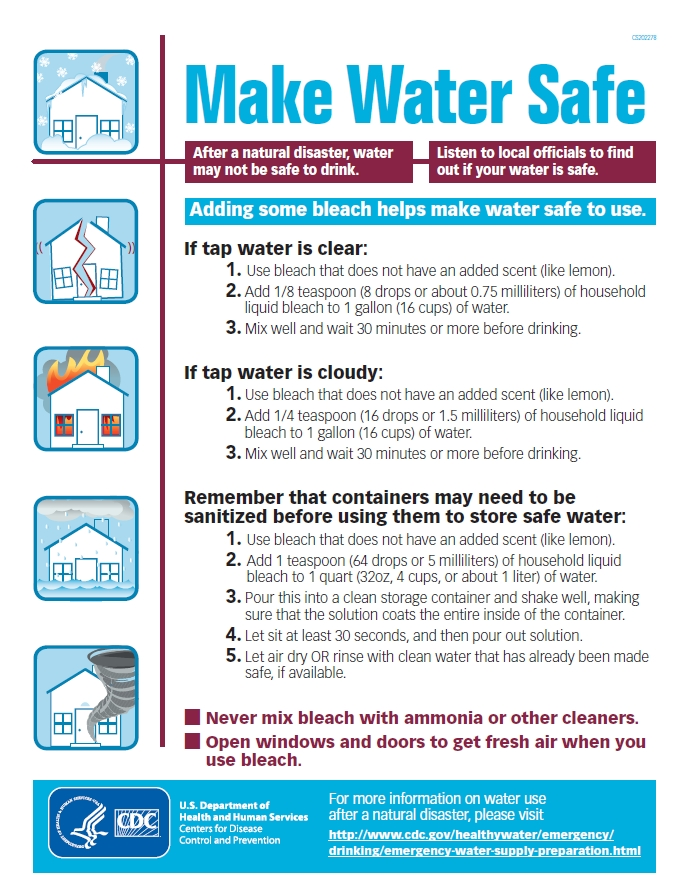
This is the most critical step. If you are using the bleach method, mix a solution of 5% to 6% sodium hypochlorite bleach with water. A standard ratio for disinfection is about 1 gallon of bleach per 500 gallons of tank capacity. Apply this to the walls and let it sit for at least 2 to 4 hours. This contact time is what actually kills the microorganisms. If you prefer vinegar, you can spray a 50/50 mix of vinegar and water, though remember this is better for cleaning and descaling than for heavy-duty pathogen removal.
Step 5: The Final Flush
Drain the disinfection solution out of the tank entirely. Do not flush this bleach water into your garden or sensitive lawns. Once the tank is empty, fill it with fresh water and open the drain valve again. Repeat this flushing process until the water running out of the tank is crystal clear and completely odorless. The goal is to remove any residual cleaner before you reconnect the tank to your home’s water system.
Common Mistakes Beginners Make
One of the biggest errors we see at TankClean.site is the “over-mixing” mistake. Some homeowners assume that if a little bit of bleach is good, a lot of bleach is better. This is dangerous. Using too high a concentration can damage the interior lining of your tank—especially if it is concrete or older plastic—and it makes the rinsing process take much longer. Stick to the recommended ratios provided in our guides.
Another common pitfall is ignoring the plumbing lines. While you have the tank filled with the disinfection solution, open all your household faucets one by one just until you smell the chlorine coming through, then shut them off. This helps sanitize the internal piping of your home as well.
Long-Term Maintenance Tips
Cleaning is not a one-time event; it is a lifecycle. We recommend a full clean and disinfection at least every six months. In between these deep cleans, keep an eye on your tank’s exterior. Ensure the lid is sealed tightly to prevent insects, lizards, or debris from entering. Check the air vent screen regularly; if the mesh is torn, it acts as an open door for contaminants.
If you are a busy homeowner, the best way to handle this is to mark your calendar. It is easy to forget about the tank until you see the water quality drop. By setting a recurring date, you ensure that this chore stays manageable and that your water stays safe for your family to use.
Stay Safe and Informed with TankClean.site
Taking control of your own water maintenance is a great way to save money and ensure your home’s water hygiene. Using a tested homemade solution for water tank cleaning and disinfection is simple, effective, and gives you peace of mind that your family is drinking clean, safe water.
We are here to help you every step of the way. If you found this guide helpful, we have plenty more resources to explore. Whether you are dealing with a concrete cistern, a plastic overhead unit, or a complex filtration setup, we have the DIY advice you need to keep things running smoothly.
Don’t wait for a contamination issue to force your hand. Click here to download our free, comprehensive Water Tank Maintenance Checklist directly from TankClean.site. If you want to stay ahead of the game, subscribe to our newsletter for seasonal maintenance reminders and expert tips tailored to your specific tank type, helping you extend the lifespan of your system and keep your water crisp and clear all year round!